Artisan supports the communication of JSON over WebSockets.
WebSocket Devices
There is one main WebSocket device type and 4 extra device, each delivering two channels, thus 10 channels of data in total.
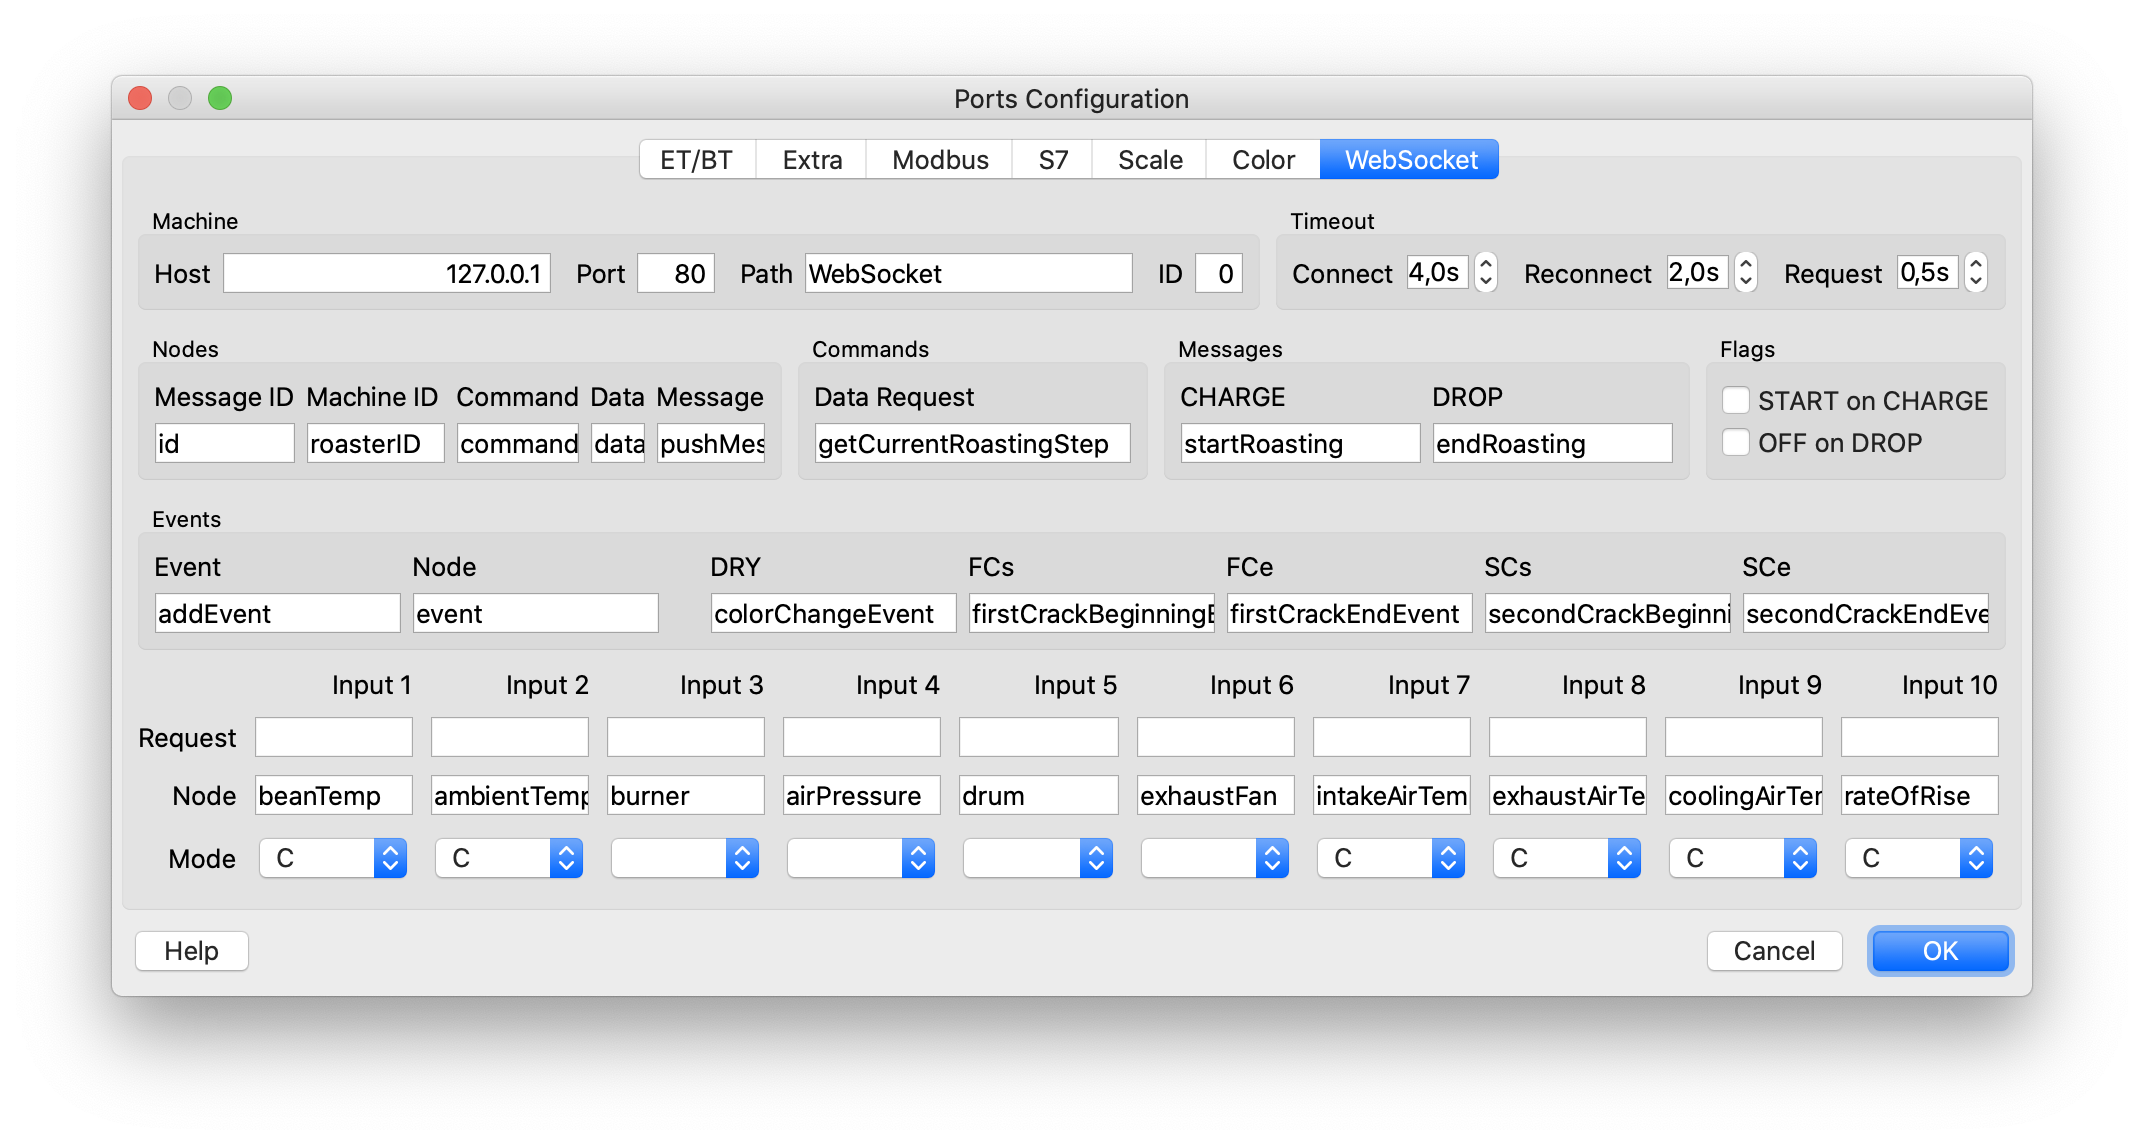
The WebSocket connection as well as those 10 WebSocket channels are configured in the WebSocket dialog (menu Config » Port, 7th tab).
The WebSocket endpoint ws://<host>:<port>/<path> is configured via the <host>, <port> and <path> components.
Connect, reconnect and request timeouts are specified in seconds.
Data request messages have the following general form:
{
  <Command>: <Data Request>,
  <Message ID>: nnnn,
  <Machine ID>: <ID>
}
All node tags can be configured in the WebSocket tab.
The message id, the number nnn, is automatically generated. The corresponding response is expected to hold the same message id at its <Message ID> node. Multiple machines can be differentiated via the <Machine ID> node with the value taken from the ID setting.
If the Data Request field is non-empty, a corresponding request for data of the above form is send each sampling interval. This request is expected to be responded by a message holding data for all WebSocket inputs.
If the Request field of one WebSocket input channel is non-empty, a corresponding data request message with its field value taken as <Command> node value is send each sampling interval. This request is expected to be responded by a message holding data for just this WebSocket input.
Note that requesting the data for all WebSocket inputs in one Data Request is usually more efficient.
A data request message as described above is expected to be answered by a response message of the following form
{
  <Message ID>: nnnn,
  <Data>: { <node_0> : v0, .., <node_n> : vn}
}
with the message id nnn has to correspond to the one of the request message and the <node_0>,..,<node_n> nodes hold the data for the corresponding WebSocket input channels.
WebSocket Push Messages
Artisan is listening to two push messages that are received without an explicit request.
- CHARGE Message:
{ <Message>: <CHARGE> } - DROP Message:
{ <Message>: <DROP> }
On receiving the CHARGE message, the CHARGE event is set. On receiving the DROP message, the DROP event is set.
In case Artisan is not yet recording on receiving the CHARGE message and the START on CHARGE flag is ticked, the recording is automatically started before the CHARGE event is registered.
In case Artisan is recording on receiving the DROP message and the OFF on DROP flag is ticked, the recording is automatically stopped after the DROP event is registered.
WebSocket Events
Artisan is listening on Event Messages of the format
{
  <Message>: <Event>,
  <data>: { <Node> : <Tag>}
}
A message with a <Tag> from the set <DRY>, <FCs>, <FCe>, <SCs>, <SCe> activates the corresponding event button in Artisan.
WebSocket Commands
Buttons and sliders can send out WebSocket Commands. The following commands in the action description are supported.
Note that WebSocket Command actions can be sequenced by separating them with semicolons like in sleep(2.5); send({{"command": "keepAlive"}})
send(<json>):
if the<json>text respects the JSON format it is send to the connected WebSocket serversleep(s):
delay processing bysseconds (float)read(<json>): if the<json>text respects the JSON format it is send to the connected WebSocket server and the response is bound to the variable_- `button(
) : sets the last button state to either "pressed" if evaluates to 1 or True and "normal", otherwise
Example Custom Event Button Action:
read({{"command": "getRoasterState"}});button(_["data"]["state"] == "ready")
Send getRoasterState request on button press and sets the button in “pressed” state if response indicate “ready”.
The placeholder {} is substituted by the event value in custom event button and slider actions. However, if the WebSocket Command is used as custom button or slider action (not as main button actions like for CHARGE, RESET, …) where this substitution takes place all regular brackets have to be escaped by duplicating them like in the following example
send(
  {{ "command": "setControlParams",
     "params": {{ "burner": {} }}
  }}
)
The placeholders {BT}, {ET}, {BTB}, {ETB}, {WEIGHTin} and{t} substituted in WebSocket Command actions by the current bean temperature (BT), environmental temperature (ET), the background profile bean temperature (BTB), the background profile environmental temperature (ETB), the batch size in g (WEIGHTin) and the time in seconds (float), respectively. Again, if such a placeholder is used in a WebSocket Command, all JSON elements have to be wrapped in an extra set of brackets as well as this placeholder substitution like in the following example.
send({{"command": "keepAlive", "params": {{BT}}}})
A similar action for the CHARGE button would have to be written without that escaping as follows:
send({"command": "keepAlive", "params": {BT}})
Examples
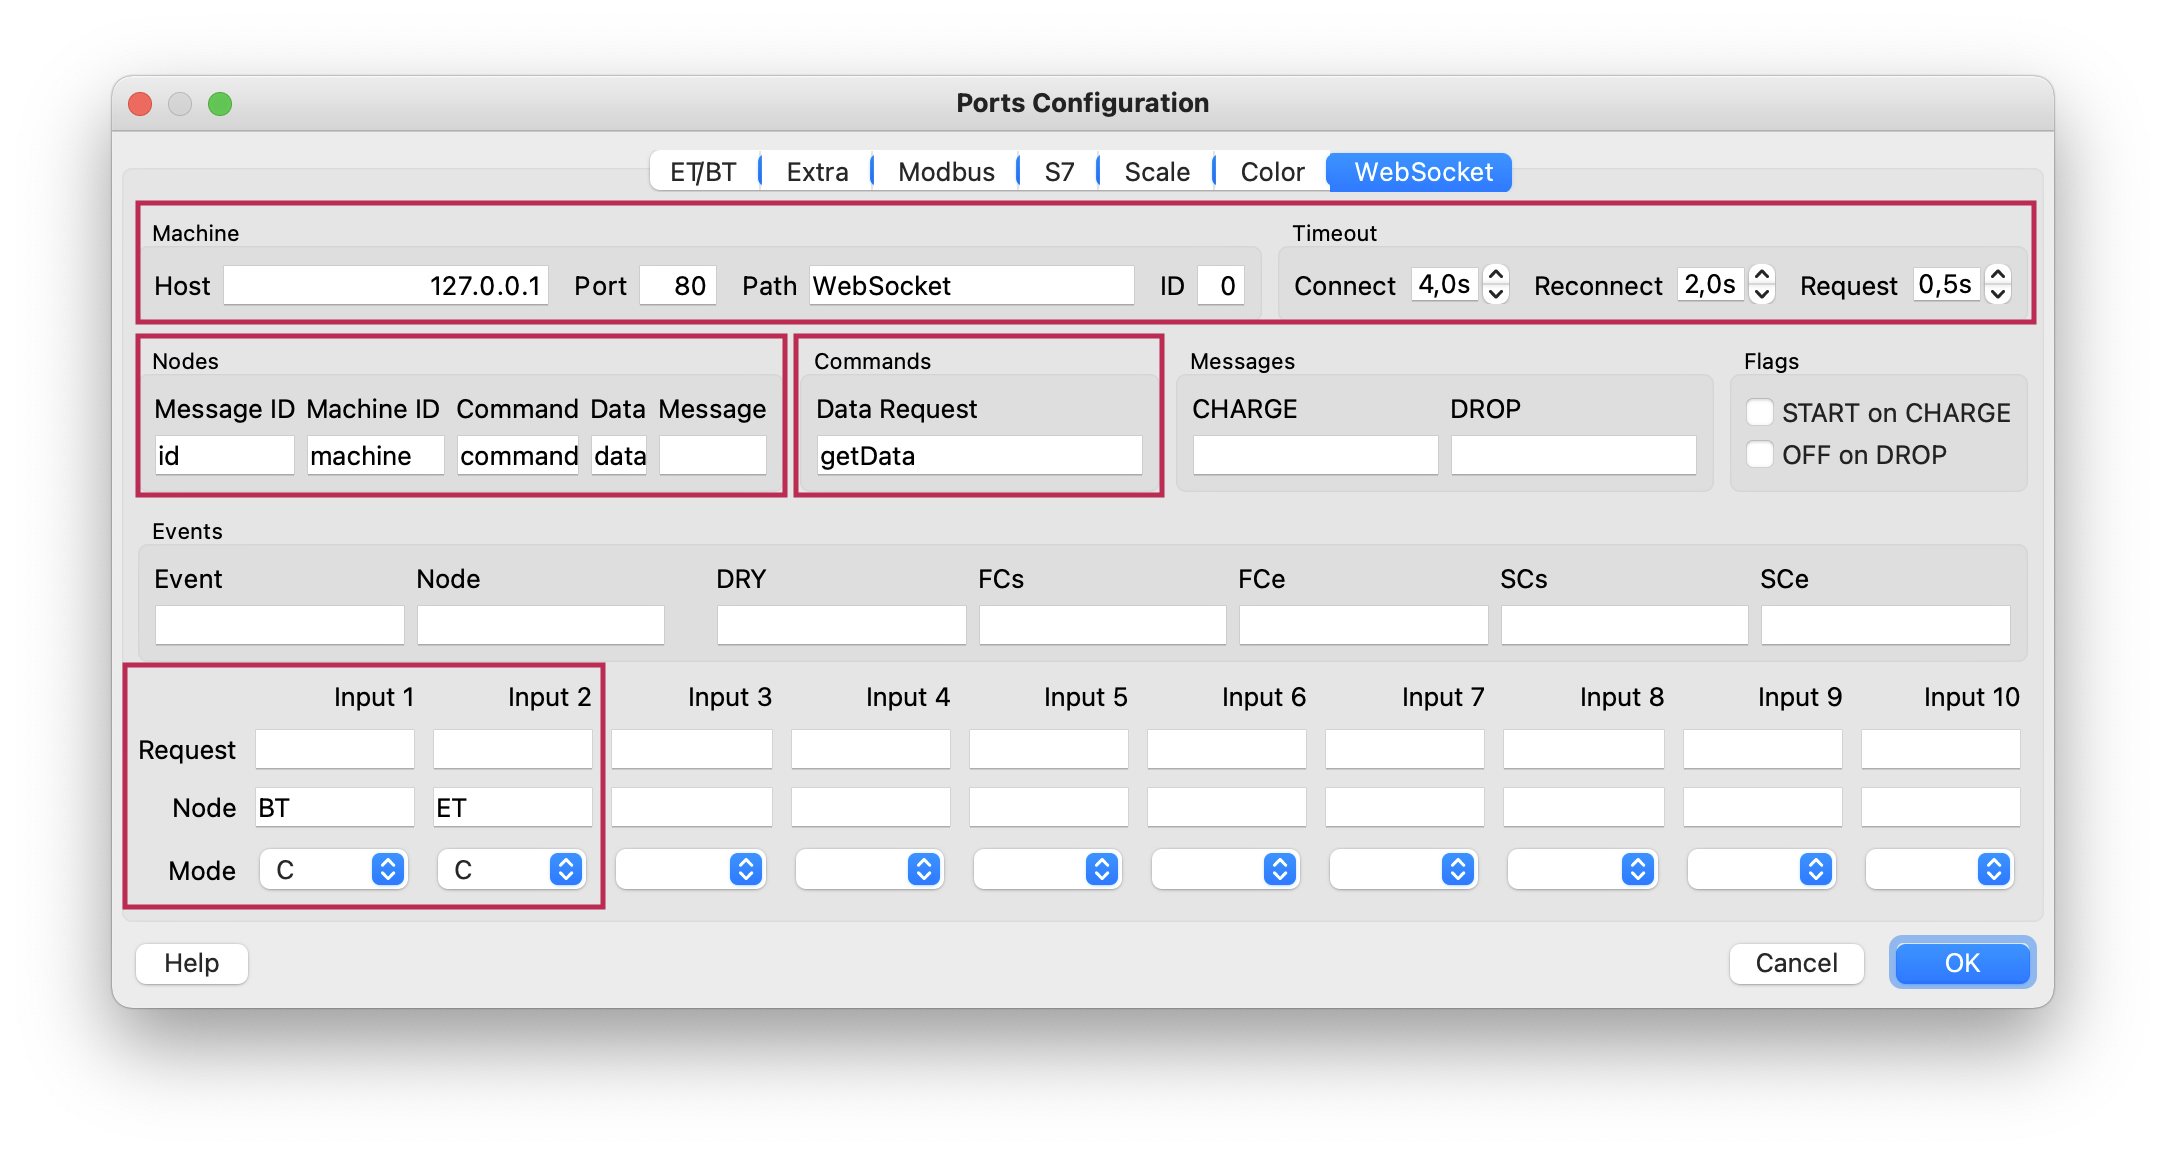
Here are two example Artisan setups to retrieve the BT and ET readings via a WebSocket from a connected device. The first setup is harvesting both readings in one request, the second setup sends individual requests per reading.
We assume Artisan on Factory Reset (menu Help » Factory Reset).
Fist we configure the main Artisan device to read BT and ET from a WebSocket.

Note: to read additional channels, add corresponding extra devices using the device types WebSocket 34, WebSocket 56, WebSocket 78 and WebSocket 910, each reading another two channels.
Single request example
The WebSocket connection is configured in the WebSocket tab (menu Config >> Ports, last tab). First the parameters of the WebSocket endpoint needs to be specified, like IP address and port number, as well as the URL path.
Next, the nodes and command tags are specified. The specification above will make Artisan send data requests like the following one
{ 'command': 'getData', 'id': 44683, 'machine': 0 }
using command as Command node, id as Message ID node, getDatathe as Data Request tag and machine as Machine ID node. As explained above, the machine id is taken from the ID field and the message id is automatically generated by Artisan per request.
The lower section specifies the tags delivering the actual data per input channel. All data is delivered in a Data node named data. The bean temperature (BT) on Input 1 is taken from the (sub-)node BT and the environmental temperature (ET) on Input 2 from the (sub-)node ET in this example. Thus the expected response for the above request should look like this
{ "id": 44683, "data": { "BT": 189.2, "ET": 220.5 } }
Individual requests example
Instead of harvesting all input channels efficiently with one request, it is also possible to configure Artisan to request data per input channel individually by leaving the getData node name empty and specifying Request nodes per individual channel, in this example using the nodes getBT and getET.
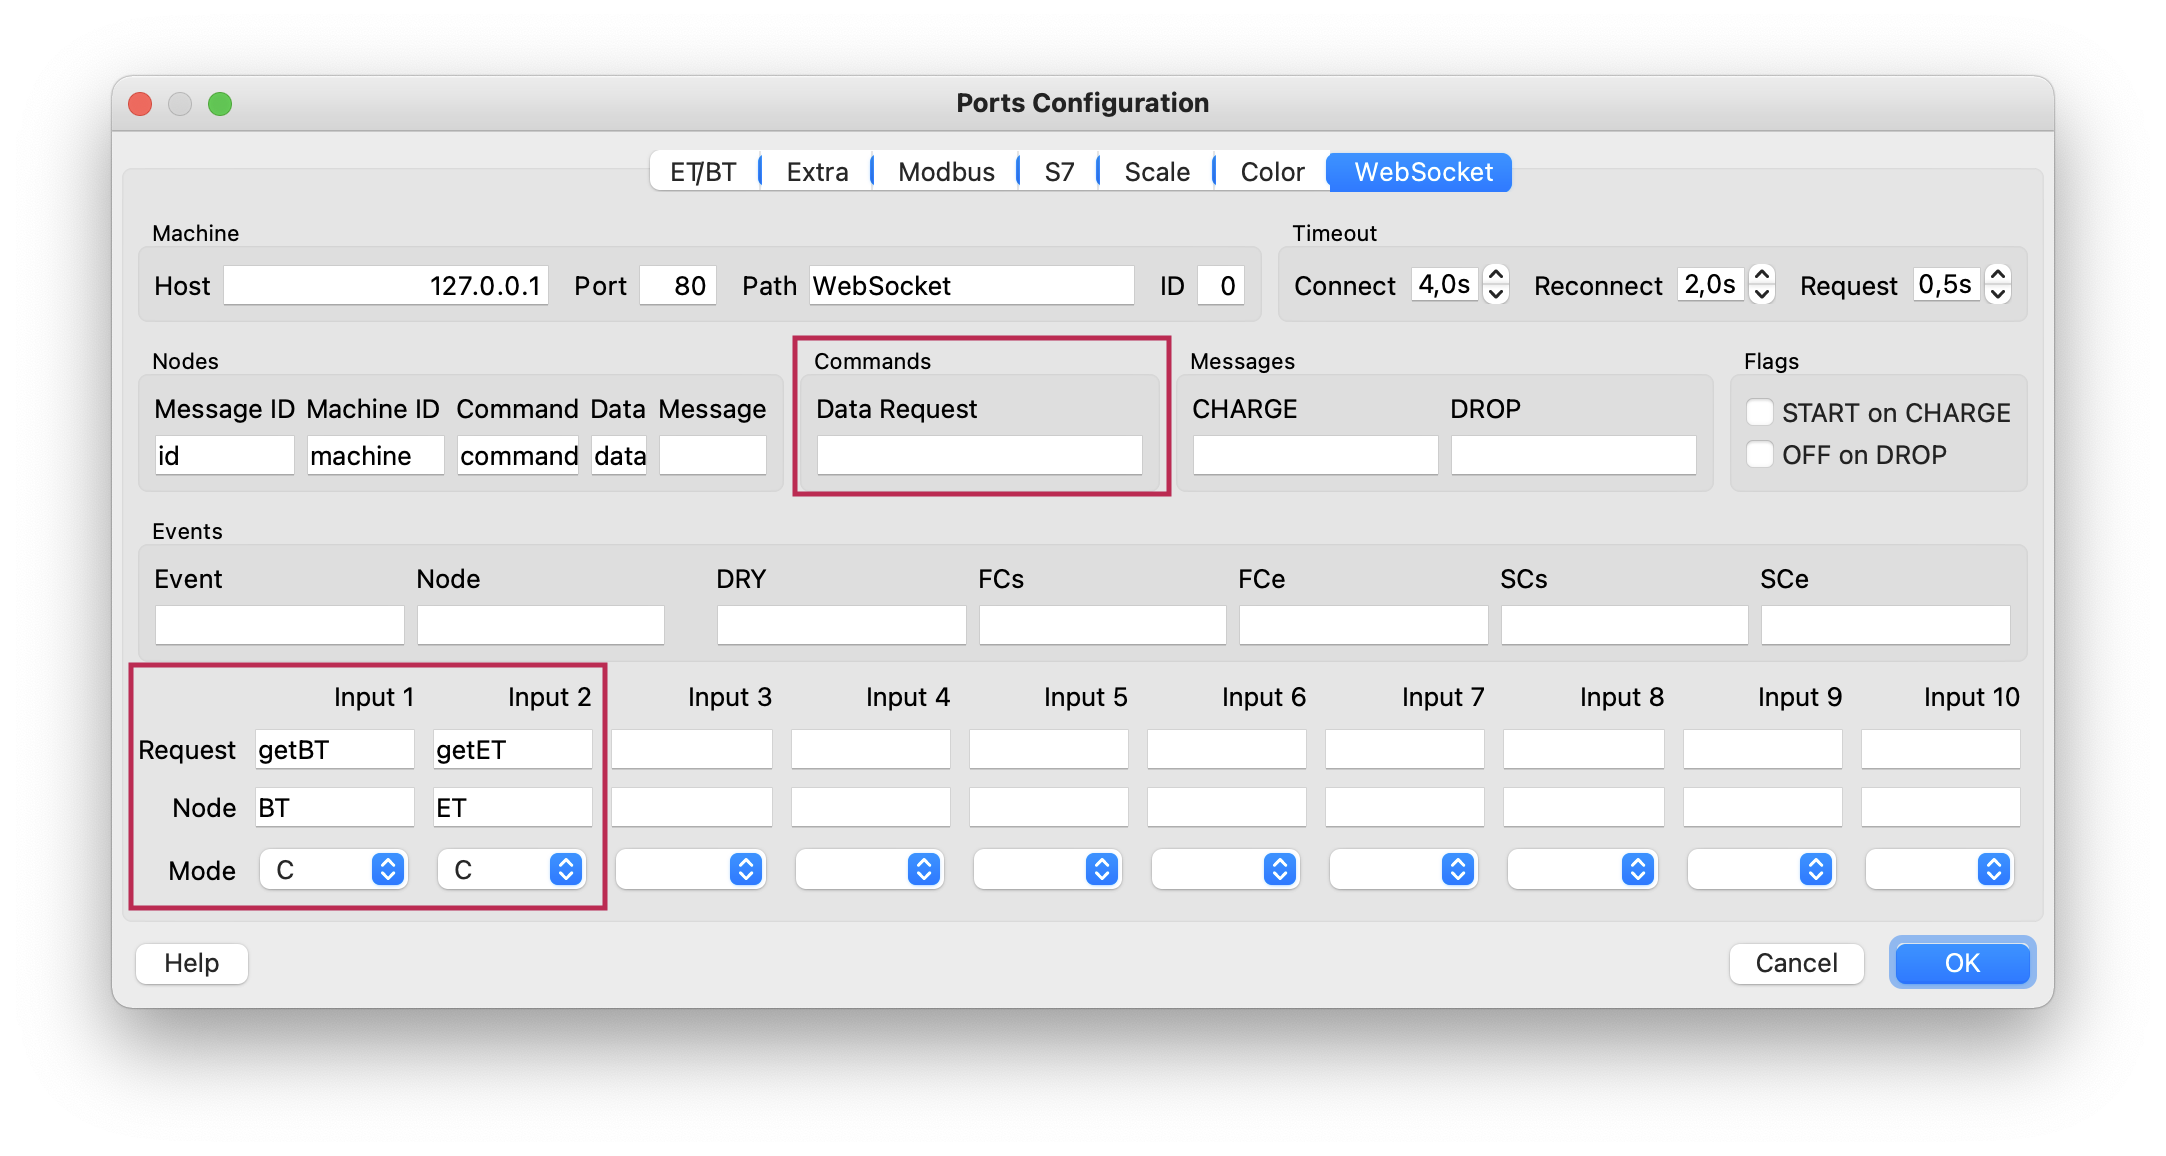
Thus the requests/response pairs (one per channel) are now as follows:
BT Request:
{ 'command': 'getBT', 'id': 58076, 'machine': 0 }
BT Response:
{ "id": 58076, "data": { "BT": 189.2 } }
ET Request:
{ 'command': 'getET', 'id': 61072, 'machine': 0 }
ET Response:
{ "id": 61072, "data": { "ET": 220.5 } }